Draw The F As Seen In The Low Power Field
Breaking News Today
Mar 12, 2025 · 5 min read
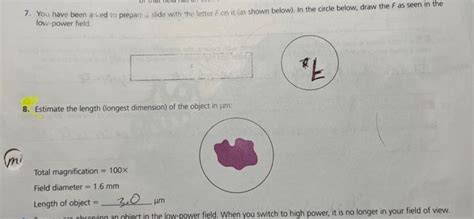
Table of Contents
Drawing the "F" as Seen in a Low Power Field: A Comprehensive Guide for Microscopy
Microscopy, particularly in the biological sciences, often requires accurate representation of observations. Drawing what you see under the microscope, especially at low power, is a crucial skill that goes beyond simple visualization; it’s a fundamental step in scientific documentation and communication. This article delves into the intricacies of accurately depicting the letter "F," as it might appear in a low power field of view, focusing on techniques, considerations, and best practices.
Understanding the Low Power Field
Before we tackle drawing the "F," it's essential to grasp the context of a "low power field." In microscopy, this refers to the image seen through the microscope at a low magnification setting, typically 4x or 10x objective lenses. This magnification provides a broader overview of the specimen, revealing a larger area of the slide than higher power lenses. The field of view is wider, and details are less resolved. This perspective is crucial for orienting yourself within the sample before moving to higher magnification for detailed examination.
Materials Required for Accurate Drawing
Accurately drawing your microscopic observations requires careful attention to detail and the right tools. Here's a list of essential materials:
- Microscope: This is, of course, fundamental. Ensure your microscope is properly calibrated and focused.
- Prepared Slide: A slide containing a specimen that includes (or can be interpreted to include) the letter "F." This could be a prepared slide specifically designed for practice, or you might create your own using a letter "F" cut from paper or drawn on transparent material.
- Drawing Paper: Choose smooth, white paper that allows for detailed lines and shading.
- Pencils: A range of pencils (e.g., HB, 2B, 4B) offers varying line weights for details and shading.
- Sharpener: Keeping your pencils sharp is crucial for precision.
- Eraser: A good quality eraser helps correct mistakes without damaging the paper.
- Ruler: While not always needed, a ruler can assist with maintaining proportions and scale.
- Colored Pencils (Optional): These can enhance your drawing by adding color to different aspects of the "F" and the surrounding field.
Techniques for Drawing the "F" in a Low Power Field
Drawing the "F" at low power is not merely about replicating its shape; it's about conveying its position relative to the field of view and any other elements present.
1. Initial Observation and Orientation
Begin by carefully focusing your microscope on the "F" at low power. Take your time to observe its size, shape, orientation, and its position within the entire field of view. Note any other features present in the surrounding area.
2. Defining the Field of View
Before you start drawing the "F," lightly sketch the perimeter of the entire field of view on your paper. This provides a frame of reference for the size and placement of the "F" within the observed area. This establishes scale and context.
3. Proportions and Scale
Accurately represent the size and proportions of the "F" relative to the field of view. This is where a ruler can be helpful to ensure that the dimensions of your drawing accurately reflect the scale of the microscopic image. For example, if the "F" occupies roughly one-quarter of the field of view, your drawing should reflect this proportion.
4. Detail and Shading
At low power, fine details of the "F" might not be sharply resolved. However, you should indicate any subtle variations in the appearance of the letter itself. For instance, if there’s slight blurring or irregularity, note these observations subtly in your drawing.
5. Adding Contextual Information
If there are other structures or elements visible in the field of view besides the "F," include them in your drawing. Their relative positions and sizes should be accurately depicted. This contextual information adds depth and meaning to your observation.
6. Labeling and Annotation
Add a title to your drawing and clearly label the "F" to avoid ambiguity. Include the magnification used (e.g., "4x objective"). If you observe any interesting features, add brief annotations to explain their significance.
Advanced Techniques for Enhanced Accuracy
For a more sophisticated rendering, consider these advanced techniques:
- Using Grids: Overlay a transparent grid on your drawing paper and a similar grid (real or imagined) on the microscope field of view. This helps maintain accurate proportions and positions.
- Drawing in Stages: Instead of trying to draw everything at once, break down the process into stages. Start with the overall outline and gradually add details.
- Practice Makes Perfect: Consistent practice is key to developing proficiency. Regularly draw different specimens at various magnifications.
Common Mistakes to Avoid
- Ignoring the Field of View: Failing to establish the boundaries of the field of view can lead to inaccurate representation of scale and position.
- Lack of Detail: Omitting subtle details or shading can make your drawing appear flat and less informative.
- Inconsistent Line Weights: Using inconsistent line weights can make your drawing look messy and unprofessional.
- Poor Labeling: Poor labeling can lead to confusion and misinterpretation of your observations.
The Importance of Accurate Microscopic Drawings
Accurate microscopic drawings are not just aesthetically pleasing; they serve several crucial purposes in scientific research and education:
- Documentation: They provide a permanent record of observations.
- Communication: They serve as a clear and concise means of communication to colleagues, students, or a wider audience.
- Analysis: Detailed drawings can facilitate the analysis of specimens and the identification of key features.
- Record Keeping: They are essential for maintaining accurate laboratory records.
Conclusion
Drawing the letter "F" as seen in a low power field of view might seem simple at first glance, but it's a fundamental exercise that hones crucial skills in observation, accuracy, and scientific communication. Mastering this technique is a stepping stone to effectively documenting and communicating your findings in various microscopic studies. By adhering to the techniques and best practices outlined in this guide, you can produce accurate, informative, and insightful microscopic drawings that effectively convey your scientific observations. Remember, consistent practice and attention to detail are key to achieving proficiency in this valuable skill.
Latest Posts
Latest Posts
-
Your New Material May Aggregate Or Bring
May 09, 2025
-
Some Economists Argue That Early Child Care
May 09, 2025
-
The Idea Behind The Marketing Concept Is
May 09, 2025
-
You Know Its Monday When Your Pen Just Randomly Explodes
May 09, 2025
-
Which Of The Following Does Not Occur During Mitosis
May 09, 2025
Related Post
Thank you for visiting our website which covers about Draw The F As Seen In The Low Power Field . We hope the information provided has been useful to you. Feel free to contact us if you have any questions or need further assistance. See you next time and don't miss to bookmark.