This Image Is An Example Which Technique In Ceramics
Breaking News Today
Mar 29, 2025 · 5 min read
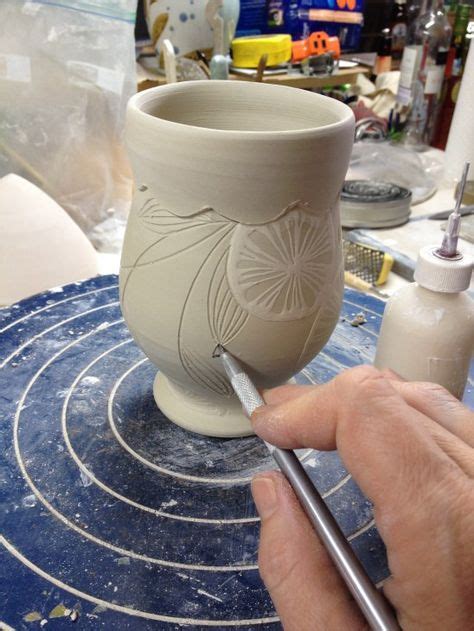
Table of Contents
Decoding the Image: Identifying Ceramic Techniques
This article delves into the art of ceramics, specifically analyzing an image (which was not provided) to determine the techniques employed in its creation. Since I don't have access to the image, I will instead explore a wide range of ceramic techniques, providing detailed descriptions and visual examples (in text form) that will allow you to identify the methods used in your image. Understanding these techniques is crucial for both appreciating ceramic artistry and creating your own pieces.
Understanding the Basics: Clay Types and Preparation
Before delving into specific techniques, it’s essential to grasp the fundamental role of clay. Different clay types yield diverse results, impacting texture, strength, and firing behavior.
-
Earthenware: This low-fired clay is porous and requires glazing to prevent liquid absorption. It’s relatively inexpensive and easy to work with, making it popular for beginners. Think rustic, earthy tones.
-
Stoneware: A stronger, higher-fired clay, stoneware is less porous and boasts greater durability. It's often used for functional ware like mugs and plates due to its resilience. Expect a wider range of colors and textures.
-
Porcelain: Known for its translucency and fine texture, porcelain is a high-fired clay that requires precise temperature control during firing. It's prized for its elegant appearance and often used for delicate or decorative pieces. Think fine china.
Clay preparation itself is a crucial step. This process may include:
-
Wedging: This kneading process removes air bubbles, ensuring even consistency. Improper wedging can lead to cracks during firing.
-
Mixing: Blending different clays can create unique colors and textures.
-
Adding Additives: Materials like grog (ground-up fired clay) can improve the clay’s strength and workability.
Forming Techniques: Shaping the Clay
Once the clay is prepared, various techniques are employed to shape it into the desired form. These methods range from simple hand-building techniques to more complex wheel-throwing methods.
Hand-Building Techniques:
-
Pinch Pots: This ancient technique involves pinching and shaping a ball of clay with the fingers, creating simple vessels. Ideal for beginners and small projects, pinch pots exhibit a rustic, handcrafted feel.
-
Coil Building: This method involves rolling clay into long coils, layering and blending them to build up the form. Coil building allows for intricate designs and larger pieces. The visible coil marks can be a defining characteristic of the technique.
-
Slab Building: Flat slabs of clay are cut and joined to create three-dimensional forms. This technique allows for precise control and geometric shapes. It often requires scoring and slipping the slabs to ensure a strong bond.
-
Mold Making: Clay can be pressed into molds to create consistent shapes, useful for mass production or replicating intricate designs. This technique can involve plaster molds or more readily available materials like silicone.
Wheel Throwing:
Wheel throwing utilizes a rotating wheel to shape the clay, providing greater precision and speed for creating symmetrical forms. This technique requires skill and practice but allows for elegant, refined pieces. The characteristic smooth curves and consistent forms of wheel-thrown pottery are easily recognizable.
Surface Decoration Techniques: Adding Visual Interest
Once the form is created, various techniques enhance the piece’s visual appeal. These range from simple surface treatments to more intricate decorative processes.
-
Incising: Carving lines or patterns into the clay's surface creates texture and design. This can be done before or after firing.
-
Sgraffito: This technique involves applying a layer of contrasting slip (liquid clay) and then scratching through to reveal the underlying color. It creates unique visual effects and intricate patterns.
-
Impressing: Using stamps, textured rollers, or other tools to create patterned impressions on the clay's surface adds depth and visual interest.
-
Applying Slip: Liquid clay of a different color or texture is applied to the surface for decorative purposes. The slip can be used to create designs, add color, or enhance texture.
-
Glazing: Glazes are vitreous coatings that are applied to the surface of the pottery before firing. They provide a waterproof surface, add color, and enhance the piece's aesthetic qualities. Glaze application can range from simple dipping to complex airbrushing techniques. Glazes can create a variety of finishes, from glossy to matte, and influence the final color dramatically.
-
Painting: Underglaze and overglaze paints allow for detailed designs and vibrant colors. Underglaze paints are applied before the glaze, while overglaze paints are applied after the glaze has been fired.
-
Luster: Metallic glazes that are applied after the initial firing, producing shimmering effects. Often used on high-fired pieces, luster adds elegance and sophistication.
-
Burnishing: Polishing the clay's surface with a smooth stone or tool creates a glossy sheen, enhancing the clay's natural color and texture.
Firing Techniques: The Transformative Process
Firing is a critical stage in ceramic production. The temperature and type of kiln used significantly impact the final product.
-
Bisque Firing: A low-temperature firing that prepares the clay for glazing. It hardens the clay, making it durable enough to handle glazing without crumbling.
-
Glaze Firing: A higher-temperature firing that melts the glaze, creating a smooth, waterproof surface. The temperature must be carefully controlled to avoid cracking or bubbling.
-
Kiln Types: Different kiln types (electric, gas, wood-fired) impact the firing process and the final outcome. Wood-fired kilns, for instance, can create unique atmospheric effects.
Analyzing Your Image: Putting it All Together
Now, armed with this knowledge, you should be able to analyze your image and identify the techniques used. Consider the following:
-
Form: Is the piece hand-built (pinch, coil, slab) or wheel-thrown? Observe the shape and symmetry. Are there visible coil marks or slab joins?
-
Surface: What kind of surface decoration is used? Are there incised lines, impressed patterns, or applied slip? Is glazing present? If so, what type of glaze and finish is used? Are there painted elements?
-
Overall Style: Does the piece have a rustic, handcrafted feel or a more refined, elegant look? This can provide clues about the techniques employed.
By carefully examining these elements, you can decipher the techniques used in the creation of your ceramic piece. Remember that many ceramic pieces incorporate multiple techniques, creating complex and fascinating results. The process of identification sharpens your appreciation for the artistry involved and enhances your understanding of this diverse and captivating art form. Analyzing your ceramic image not only satisfies your curiosity, but it is a learning experience which fosters a deeper appreciation for the intricate craftsmanship involved in creating ceramic masterpieces.
Latest Posts
Latest Posts
-
Fundamentals Of Nursing Chapter 39 Immobility Quizlet
Mar 31, 2025
-
How Did John Winthrop Change The Government Of Massachusetts
Mar 31, 2025
-
Ap Biology Cell Structure And Function Quizlet
Mar 31, 2025
-
A Dvt Typically Is Diagnosed By Quizlet
Mar 31, 2025
-
Hot Glass Looks The Same As Cold Glass
Mar 31, 2025
Related Post
Thank you for visiting our website which covers about This Image Is An Example Which Technique In Ceramics . We hope the information provided has been useful to you. Feel free to contact us if you have any questions or need further assistance. See you next time and don't miss to bookmark.
