How To Reference Cell A1 From Alpha Worksheet
Breaking News Today
Mar 15, 2025 · 6 min read
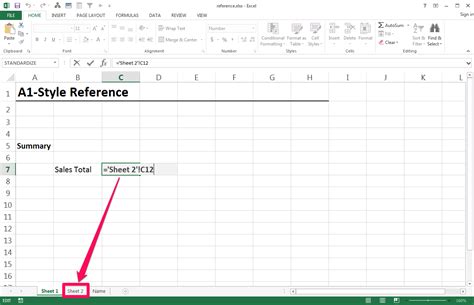
Table of Contents
How to Reference Cell A1 from the "Alpha" Worksheet: A Comprehensive Guide
Referencing cells across different worksheets in spreadsheet software like Microsoft Excel or Google Sheets is a fundamental skill for anyone working with data. This comprehensive guide will walk you through various methods of referencing cell A1 from a worksheet named "Alpha," covering everything from basic techniques to advanced scenarios. We'll explore different referencing styles and explain their use cases, helping you master this essential aspect of spreadsheet management.
Understanding Worksheet References
Before diving into specific examples, it's crucial to understand how worksheet references work. Essentially, you're telling your spreadsheet to look up information in a specific location on a different sheet. This location is defined by the sheet name and the cell coordinates. A mis-typed sheet name or incorrect cell coordinates will result in a #REF! error. Always double-check your spelling and cell references.
The general syntax for referencing a cell from another worksheet is:
='WorksheetName'!CellReference
For example, to reference cell A1 from the "Alpha" worksheet, you would use:
='Alpha'!A1
Different Methods for Referencing Cell A1 from "Alpha"
There are several ways to achieve this, each with its own advantages and potential applications.
1. Direct Cell Referencing: The Simplest Approach
This is the most straightforward method and is widely used. You simply type the formula directly into the cell where you want the value from 'Alpha'!A1 to appear.
Steps:
- Navigate to the cell where you want the reference.
- Type the formula
='Alpha'!A1. Notice the single quote marks around the worksheet name "Alpha" – this is essential if the worksheet name contains spaces or special characters. - Press Enter.
The value in cell A1 of the "Alpha" worksheet will now appear in the cell where you entered the formula. Any changes made to 'Alpha'!A1 will automatically update the referenced cell.
Example:
Let's say you have a summary sheet and you want to display the value of 'Alpha'!A1 on this sheet in cell B2. You would simply enter ='Alpha'!A1 in cell B2.
2. Using the Insert Function Feature
For users who prefer a visual approach, using the Insert Function feature provides a guided process. While this method might seem longer, it reduces the risk of typos, especially for complex formulas.
Steps:
- Select the cell where you want the referenced value.
- Click on the "Formulas" tab (in Excel) or the "Insert" menu (in Google Sheets).
- Select "Insert Function" (or a similar option). This will open a function wizard.
- Start typing
'Alpha'!A1in the function input field. The function wizard will often help you auto-complete the formula based on the initial input. - Press Enter.
This method is particularly helpful when dealing with numerous worksheets or complex formulas.
3. Copying and Pasting the Reference
This is a quick method, suitable for simple references. However, remember that relative references will adjust when copied, which might not be what you want if you need an absolute reference.
Steps:
- Select cell A1 in the "Alpha" worksheet.
- Copy the cell (Ctrl+C or Cmd+C).
- Navigate to the destination cell in your target worksheet.
- Paste the cell (Ctrl+V or Cmd+V).
This method effectively copies the value of cell A1. If the value of 'Alpha'!A1 changes, the pasted value in your target worksheet will not update unless you paste it as a linked formula. Make sure to check this setting when you paste the contents.
4. Using Named Ranges: Enhancing Organization and Readability
Named ranges offer a significant improvement in readability and maintainability, especially when working with numerous sheets and complex formulas.
Steps:
- Define a Named Range in "Alpha": Select cell A1 in the "Alpha" worksheet. In the "Formulas" tab, find "Define Name" (Excel) or "Data" then "Named ranges" (Google Sheets). Give the range a name, such as "Alpha_A1".
- Reference the Named Range: In your target worksheet, use the name in your formula:
=Alpha_A1.
This approach makes your formulas much clearer. If you ever rename the sheet "Alpha," you only need to update the name once, rather than in every formula that references it.
5. Using INDIRECT Function: Dynamic Worksheet Referencing
The INDIRECT function is incredibly powerful for creating dynamic references. This means you can change the sheet name or cell reference within the formula itself, making it extremely versatile.
Example:
Let’s say you have a cell (e.g., B1) containing the name of the sheet, "Alpha". The formula to reference A1 would be:
=INDIRECT("'"&B1&"'!A1")
This formula takes the sheet name from cell B1, constructs the correct reference, and then retrieves the value. This is excellent for creating flexible reports where you might want to change the source sheet dynamically.
Advanced Scenarios and Considerations
Handling Sheet Names with Spaces or Special Characters
When your sheet names contain spaces or special characters (e.g., "Sheet 1", "My Sheet!"), always enclose the sheet name in single quotes within the formula. This is critical to avoid errors. For example:
='My Sheet!'!A1
Absolute vs. Relative References
Understanding the difference between absolute and relative cell references is crucial when copying formulas.
- Relative Reference: A relative reference adjusts when the formula is copied to a different cell.
- Absolute Reference: An absolute reference remains constant even when the formula is copied. You create an absolute reference by adding a dollar sign ($) before the column letter and/or row number (e.g.,
=$A$1).
If you copy the formula ='Alpha'!A1 to another cell, the reference remains to 'Alpha'!A1. However, if you have a formula like ='Alpha'!A1 + B1, copying this formula will adjust the B1 reference relatively, but 'Alpha'!A1 will stay the same.
Error Handling
It's good practice to incorporate error handling into your formulas. The IFERROR function can be used to handle potential errors such as the sheet not existing or the cell being empty.
Example:
=IFERROR('Alpha'!A1, "Error: Data not found")
This formula displays "Error: Data not found" if there's an error referencing 'Alpha'!A1, otherwise it shows the value of 'Alpha'!A1.
Large Datasets and Performance
When dealing with extremely large datasets and numerous cross-sheet references, be mindful of performance. Excessive cross-sheet references can slow down your spreadsheet. Consider using alternative techniques such as data consolidation or Power Query (in Excel) to improve efficiency.
Conclusion
Mastering the art of referencing cells across worksheets is paramount for anyone working with spreadsheets. This guide has presented various methods, from the basic direct referencing to advanced techniques like using named ranges and the INDIRECT function. By understanding the nuances of each method and applying the best practices discussed here, you can significantly enhance your spreadsheet skills and improve the efficiency and accuracy of your work. Remember to always double-check your formulas and consider error handling to create robust and reliable spreadsheets.
Latest Posts
Latest Posts
-
Life Insurance Exam Questions And Answers Pdf
Mar 18, 2025
-
The Direct Carry Is Used To Transfer A Patient
Mar 18, 2025
-
The Emancipation Proclamation Of January 1 1863 Quizlet
Mar 18, 2025
-
These Cards Will Get You Drunk Quizlet
Mar 18, 2025
-
Did Quizlet Get Rid Of Q Chat
Mar 18, 2025
Related Post
Thank you for visiting our website which covers about How To Reference Cell A1 From Alpha Worksheet . We hope the information provided has been useful to you. Feel free to contact us if you have any questions or need further assistance. See you next time and don't miss to bookmark.
