What Is The Final Step In A Cavity Preparation
Breaking News Today
Mar 16, 2025 · 6 min read
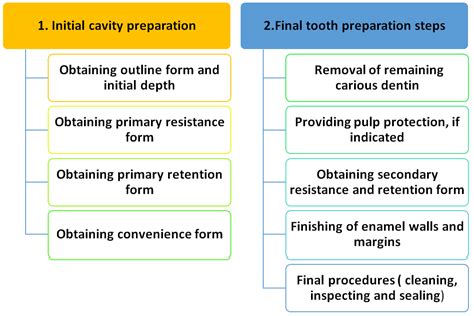
Table of Contents
What is the Final Step in a Cavity Preparation? A Comprehensive Guide for Dental Professionals
The final step in cavity preparation is not a singular action, but rather a series of crucial procedures ensuring the longevity and success of the restoration. It's a phase demanding meticulous attention to detail, encompassing the transition from the prepared tooth structure to the placement of the restorative material. This article will delve deep into this critical final stage, exploring its nuances and highlighting the importance of each component.
Beyond the Bur: Preparing for the Restorative Material
Before we pinpoint the final step, let's establish a clear understanding of what precedes it. A proper cavity preparation involves several stages:
1. Entry into Dentin: Establishing the Outline Form
The initial stages focus on accessing the caries, removing infected and undermined enamel and dentin. The goal here is to establish a strong, defined outline form – the foundation upon which the restoration will rest. This stage necessitates precise bur selection and careful manipulation to avoid unnecessary removal of healthy tooth structure.
2. Removal of Carious Dentin: The Foundation of Success
Once the outline is established, the focus shifts to complete caries removal. This requires a thorough examination to ensure all infected dentin is removed, preventing recurrent caries. Different techniques, including caries excavation and selective caries removal, may be employed depending on the caries depth and extent. Careful attention is paid to avoid perforations or excessive removal of sound tooth structure.
3. Shaping the Cavity Walls: Achieving Retention and Resistance
The shape of the cavity walls is crucial for the retention and resistance of the restoration. Specific angles and configurations are created to ensure the restoration remains securely in place and resists dislodgement under occlusal forces. This step emphasizes the interplay between the restorative material and the cavity form, requiring a deep understanding of material properties and their interaction with the tooth structure.
4. Smoothing and Cleaning the Cavity: Preparing the Substrate
Before proceeding to the final steps, careful smoothing and cleaning of the cavity walls are essential. This removes any debris or irregularities that could interfere with the proper seating and bonding of the restorative material. Appropriate instruments and techniques, such as high-speed handpieces with polishing burs and air abrasion, are used to ensure a clean and polished surface. Adequate irrigation and aspiration throughout the preparation process are vital to eliminate debris and maintain a clear operating field.
The Final Steps: A Multi-faceted Approach
Now, let's address the final steps, which are intertwined and crucial for the success of the procedure:
1. Cavity Debridement: Eliminating Residual Debris
Thorough debridement is paramount. This goes beyond the simple smoothing and cleaning discussed earlier. It involves meticulous removal of all remaining debris, including microscopic particles that can negatively affect the bond strength between the tooth structure and the restoration. This may involve the use of specialized instruments and techniques to ensure the complete elimination of any debris from the cavity.
2. Cavity Liner Application (if indicated): Protecting the Pulp
In certain cases, a cavity liner is applied to protect the pulp from potential irritants or to promote reparative dentin formation. The choice of liner depends on various factors, including the proximity of the preparation to the pulp and the overall clinical situation. This step acts as a barrier between the restoration and the sensitive pulp tissue, protecting against possible chemical or thermal irritation.
3. Base Application (if indicated): Providing Structural Support
If there is a significant depth of cavity preparation, a base material may be necessary. This provides structural support for the restoration and can also help insulate the pulp. The base material will determine the final height of the restorative material in the cavity. Selection criteria depends on factors such as cavity depth, proximity to the pulp, and the specific restorative material used.
4. Acid Etching: Ensuring Micromechanical Retention
This involves etching the prepared enamel and dentin with an acid solution (usually phosphoric acid) to create a micro-roughened surface. This roughened surface enhances micromechanical retention, improving the bond strength between the tooth structure and the adhesive restorative material. Careful control of etching time is critical to avoid over-etching, which can compromise the bond strength.
5. Primer and Adhesive Application: Facilitating Bond Formation
After etching, a primer and bonding agent are carefully applied. The primer helps to improve the penetration of the adhesive into the etched surface, while the adhesive acts as the link between the etched tooth structure and the restorative material. This creates a robust hybrid layer improving the durability and longevity of the restoration. The manufacturer's instructions for both primer and adhesive must be followed meticulously.
6. Final Assessment: A Crucial Quality Control Step
Before the placement of the final restorative material, a thorough final assessment is crucial. This involves checking the:
- Cleanliness of the cavity: Is there any residual debris or moisture?
- Adequacy of etching and bonding: Does the etched surface appear properly etched, and is the adhesive correctly applied?
- Depth of the cavity preparation: Does it match the planned restoration?
- Overall condition of the tooth: Are there any cracks, fractures, or other anomalies?
This comprehensive final assessment helps ensure that the restoration will be placed optimally and achieve its intended longevity. Addressing any identified issues at this point is far more efficient and less disruptive than attempting to rectify them after the restoration is placed.
The Importance of the Final Step: Long-Term Success
The final steps in cavity preparation are not merely a finishing touch; they are critical for the long-term success of the restoration. A meticulous approach ensures:
- Stronger bond strength: Improved micromechanical retention and optimal bonding lead to a more durable and long-lasting restoration.
- Reduced risk of recurrent caries: Thorough debridement and proper liner application minimize the risk of future decay.
- Protection of the pulp: Careful cavity preparation and liner application protect the sensitive pulp from irritation.
- Enhanced esthetics: A well-prepared cavity leads to a more natural-looking restoration.
- Increased patient comfort: A smooth, well-prepared cavity leads to increased patient comfort.
Conclusion: Mastery of Detail
The final step in cavity preparation is not a single action but rather a culmination of precise, sequential steps that determine the outcome of the restorative procedure. It demands meticulous attention to detail, a deep understanding of dental materials, and a commitment to providing the highest quality care. Mastering these final steps is essential for delivering restorations that are not only aesthetically pleasing but also functionally sound and durable, ensuring long-term oral health for the patient. Continuous learning, advanced training, and adherence to best practices are all crucial for dentists aiming for excellence in restorative dentistry. The investment in these final stages ultimately translates to higher patient satisfaction and the preservation of oral health.
Latest Posts
Latest Posts
-
Life Insurance Exam Questions And Answers Pdf
Mar 18, 2025
-
The Direct Carry Is Used To Transfer A Patient
Mar 18, 2025
-
The Emancipation Proclamation Of January 1 1863 Quizlet
Mar 18, 2025
-
These Cards Will Get You Drunk Quizlet
Mar 18, 2025
-
Did Quizlet Get Rid Of Q Chat
Mar 18, 2025
Related Post
Thank you for visiting our website which covers about What Is The Final Step In A Cavity Preparation . We hope the information provided has been useful to you. Feel free to contact us if you have any questions or need further assistance. See you next time and don't miss to bookmark.
